Focus on what matter and live life at your own pace.
前言
雖然直到最近才實際在工作上使用 TypeScript 進行開發,但是早在去年就有斷斷續續在自己的 side project 上玩玩 TypeScript,剛好後來公司讀書會在研讀經典的 Design Pattern 書籍,就索性使用 TypeScript 來製作範例,意外發現 TypeScript 在講解一些 Design Pattern 的時候非常適合,不僅能夠有類別、物件等清楚的表示,也能夠直接在網頁上做出會動的範例。
雖然這是蠻久之前製作的,但最近想想還是可以分享一下!所以今天就以 TypeScript 來製作範例,為大家講解 Command Pattern!
Command Pattern
在 GoF Design Patterns(也就是 Design Patterns: Elements of Reusable Object-Oriented Software 這本書)中 Command Pattern 屬於 Behavioural Patterns 的一種,主要是定義類別與物件之間的溝通與互動方法。
Command Pattern 的初衷,是希望能將各種對物件的操作(request)也都獨立包裝成物件,如此一來,這個 request,就能夠在各個物件對象之間傳遞,甚至提供 undoable 的 operation。
我們可以從 UML 圖來理解:
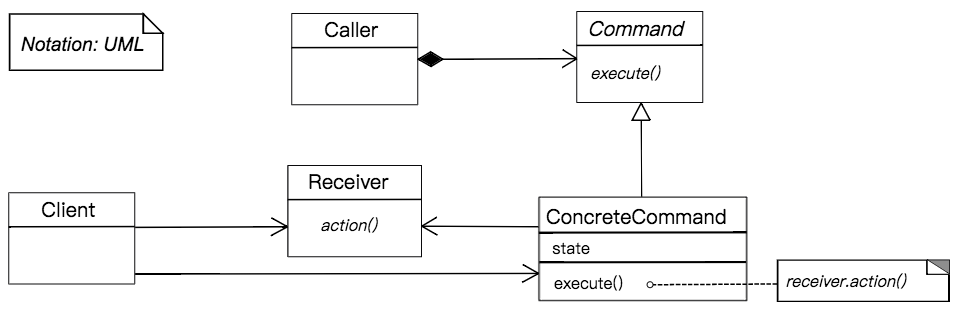
By Sae1962 - Own work, CC BY-SA 4.0, Link
-
Command
- 定義出一個 Command 介面,用來執行操作,該介面只需要定義一個
Execute()這個抽象 method。
- 定義出一個 Command 介面,用來執行操作,該介面只需要定義一個
-
Concrete Command
- 從抽象的 Command 介面所實作的 Concrete Command,會實作該 Command 實際上要執行的動作內容,也就是實作
Execute(),此外,他還需要負責將 接收操作的物件(receiver) 與 動作(Action)本身連結起來。簡單來說,就是他會被傳遞進一個物件,並且在Execute()函數中,trigger receiver 執行相對的動作。這邊值得注意的是,Concrete Command 本身並不管也不知道 receiver 會怎麼實作他們的 action,他只需要告訴 receiver 他想要完成的是什麼命令即可。
- 從抽象的 Command 介面所實作的 Concrete Command,會實作該 Command 實際上要執行的動作內容,也就是實作
-
Client
- 負責創建 Concrete Command,並指定其 receiver。
-
Invoker
- 就是下達指令的人,負責呼叫 Command。
-
Receiver
- 知道接受到 Command 時,要執行什麼動作(Action)的人。
光看 UML,一定還不太清楚,接著我們從 sequence diagram 來看看這幾個對象彼此之間如何互動:
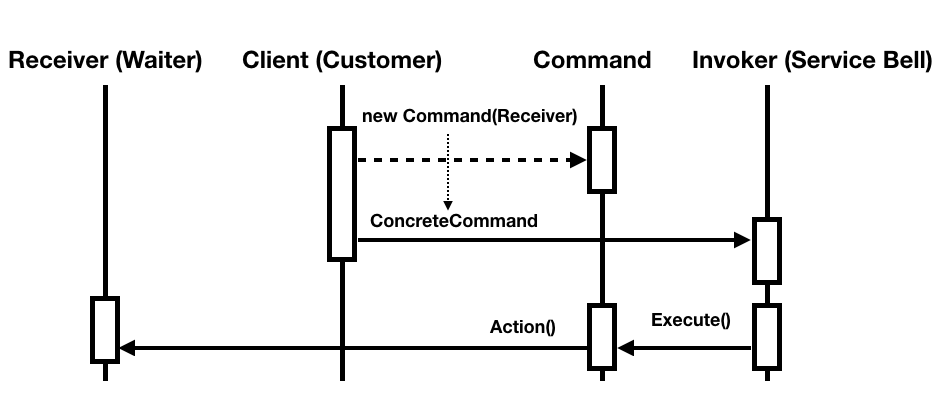
可以想像,Receiver 就是餐廳服務生,而 Client 就是顧客,顧客會知道要對服務生下達指令,所以會產生 new Command(Receiver);但他可能需要透過服務鈴(Invoker),才能讓服務生真正去執行他的指令。
接著我們先來看看實際的範例。
TypeScript 實作範例
當顧客點選 "Give me food" 按鈕時,服務生就會接收到指令,並趕緊去找廚師;而當顧客想更改餐點時,可以透過 "Hey get back",下達指令來回復服務生的上一個動作。
很簡單暴力的範例吧XD
實際上的程式怎麼寫呢?
首先我們先從定義 Command 介面開始:
export class Command {
  public execute(): void {
    throw new Error("Abstract method!");
  }
  public unexecute(): void {
    throw new Error("Abstract method!");
  }
}
如同先前 UML 圖所描述,我們只定義抽象的 execute() method,在 TypeScript 中要模擬抽象方法的最簡單做法就是讓他 throw Error。
另外我們同時也定義一個 unexecute(),作為回復的操作。
[2019/04/22 - Update]
感謝 @pilagod 的補充,TypeScript 有提供 Abstract 類別,可以強迫繼承者去實作其抽象函數,所以我們的 Command class 可以寫成:
export abstract class Command {
  abstract execute(): void;
  abstract unexecute(): void;
}
import * as React from "react";
import { Waiter } from "./Waiter";
export class ConcreteOrderCommand extends Command {
private receiver: React.RefObject<Waiter>;
private position: number;
constructor(receiver: React.RefObject<Waiter>) {
super();
this.receiver = receiver;
this.position = 0;
}
public execute(): void {
console.log("`execute` method of ConcreteOrderCommand is being called!");
this.position = 300;
this.receiver.current.action(this.position);
}
public unexecute(): void {
console.log("`execut` method of ConcreteOrderCommand is being called!");
this.position = 0;
this.receiver.current.backAction(this.position);
}
}再來實作 ConcreteCommand,我們 extend 抽象的 Command 類別,指定兩個私有變數:receiver 與 position。
receiver 可以從其宣告的類別看出,就是 Waiter,這就是 TypeScript 適合說明 Design Pattern 的優點之一,可以很明確看到關聯性,我們待會會看到 Waiter 的實作。而 position 則是範例中我們用在 execute() 中,告訴 receiver 該如何 action 的工具,在範例中就是改變 Waiter 的位置。
在 ConcreteCommand 的 execute() 實作中,我們定義出 "這個 Command" 要讓 "其受指定的 receiver" 進行怎樣的 "action",也就是這行:
this.receiver.current.action(this.position);
我們告訴 receiver 說,請依照 this.position 這個參數去執行你的 action,但記住,你的 action 到底是怎麼實作的我並不管你。
(這邊跟 React 相關的不做太多解釋,基本上因為我們需要在 ConcreteCommand 中去呼叫 receiver 的 action method,所以採用 React.RefObject<T> 作為 receiver 的類型,這樣我們能透過 .current 的 API 去取得 React 實體。)
看到這邊可以發現,由於我們並不需要知道 receiver 本身怎麼實作 action,所以關注點可以分離,只要管好自己這邊如何呼叫 receiver 即可。
到這邊為止,我們已經實作完 UML 中的 Command 介面與 ConcreteCommand 了,接著輪到 Receiver:
import * as React from "react";
const waiterStyle = {
  display: "flex",
  flexDirection: "column",
  alignItems: "center",
  transition: "all 1s ease-in-out"
};
type WaiterProps = {
  ref: React.RefObject<Waiter>;
};
type WaiterState = {
  position: number;
};
export class Waiter extends React.Component<WaiterProps, WaiterState> {
  constructor(props: any) {
    super(props);
  }
  state = {
    position: 0
  };
  action = (position: number) => {
    console.log("command action!");
    this.setState({
      position
    });
  };
  backAction = (position: number) => {
    console.log("command back action!");
    this.setState({
      position
    });
  };
  render() {
    const { position } = this.state;
    return (
      <div style={{ ...waiterStyle, transform: `translateX(${position}px)` }}>
        <img
          width="100px"
          src="https://image.flaticon.com/icons/svg/816/816577.svg"
        />
      </div>
    );
  }
}
Receiver 也很簡單,重點在於實作 action。以範例來說,我們會從 ConcreteCommand 接收到新的 position state,所以我們要執行的動作就是 this.setState({ position }),將自身的狀態改變。透過 TypeScript,可以清楚定義 state 與 props 的型別。
Waiter 需要接收一個 ref: React.RefObject<Waiter>; 的 Props,則是與 React 實作相關,因為我是利用 const WaiterRef = React.createRef<Waiter>(); 將 Waiter 的 ref 傳遞給 ConcreteCommand。(可參考 Codesandbox 內的完整程式碼)
最後,有了指令(ConcreteCommand),有了接收指令的人(Waiter),我們來看看 Customer 要如何使用指令來呼叫 Waiter 吧:
// 有刪除一些不重要的 code,i.e. style, etc.
import * as React from "react";
import { Waiter } from "./Waiter";
import { Command, ConcreteOrderCommand } from "./CommandPattern";
type CustomerProps = {
  WaiterRef: React.RefObject<Waiter>;
};
type CustomerState = {
  orderCommand: Command;
};
export class Customer extends React.Component<CustomerProps, CustomerState> {
  constructor(props: any) {
    super(props);
    const { WaiterRef } = props;
    this.state = {
      orderCommand: new ConcreteOrderCommand(WaiterRef)
    };
  }
  render() {
    return (
      <div style={CustomerStyle}>
        <div
          onMouseEnter={() => this.setState({ btn1OnHover: true })}
          onMouseLeave={() => this.setState({ btn1OnHover: false })}
          onClick={() => {
            this.state.orderCommand.execute();
          }}
        >
          Give me food!!
        </div>
        <div
          onMouseEnter={() => this.setState({ btn2OnHover: true })}
          onMouseLeave={() => this.setState({ btn2OnHover: false })}
          onClick={() => {
            this.state.orderCommand.unexecute();
          }}
        >
          Hey get back!!
        </div>
      </div>
    );
  }
}
基本上 Customer 就是會保有 ConcreteCommand 在 state 當中,這樣才能合理的不斷下達指令。
另外也需要取得 WaiterRef 這個 props,才能在初始 ConcreteCommand 時指定其 receiver。
接著我們只要在不同功能的 button 上綁定 command 即可,分別呼叫 this.state.orderCommand.execute(); 與 this.state.orderCommand.unexecute();。
如此一來,我們就成功用 TypeScript 實作一個完整的 Command Pattern 範例啦!(完整的程式碼請看上方 CodeSandbox 連結)
Command Pattern 的 Consequences
- Command Pattern 將呼叫指令的物件與執行指令的物件切割開來,降低彼此之間耦合度。
- Command 是 first-class objects,可以被傳遞、操作與繼承。
- 可以 composite 多個 Command 到一個 Command 中,類似巨集概念。
- 增加 Command 很容易,因為你不需要更改其他的現有 Class。
實作 Command Pattern 上所需要注意的細節
- 需要思考一個 Command 該擁有多少能力,是要單純作 receiver 與 action 之間的 binding,大部分實作擺在 receiver;抑或是將大多實作自己處理掉,receiver 只是一個命令的受體?
- 是否需要支援 undo 功能,Command Pattern 設計上天生支援 undo,但實際實作上你可能會需要額外的儲存 state 來達成,會增加開發複雜度。
- 若是支援 undo,還得注意發生 error 時,會不會不斷累積,難以 debug。
結論
TypeScript 現在非常熱門,Design Pattern 則是萬年不敗,兩者搭配起來一起學習可說是天作之合!尤其是平常工作沒有機會碰觸到的話,透過這種方式學習不僅兩者皆能吸收,還能累積點小玩具。
但說起來,TypeScript 的爭議也不少,最近參加了優秀新同事們主辦的幾場 Meetup,再次燃起我對 Elm 的興趣,可惜剛到新環境,瑣事太多,還來不及有個成果分享,不過也算是有點心得,希望之後能夠分享一下。